
7 Ways to Make Your Unity Components More User-Friendly
The game’s programmer may have known what that strangely named variable did (at one point in time), but does the designer or artist? If you have a team working on a project in Unity, making sure that the components on your game objects are understandable, organized, and easy to edit will help streamline the whole process. There are many ways to do this, such as a range slider for values, or the drawing of gizmos to assist in visually debugging. Here are a few:
1. Use Headers, Tooltips, and Other Attributes.
Scripts in Unity can use what are called Attributes. You’ll typically see them starting with start and end square brackets, preceding a method, variable, or class. For example, you may have encountered one already in the form of [SerializeField] or [HideInInspector]. They have many different effects, including the ability to organize and style the way that a component appears in the editor.
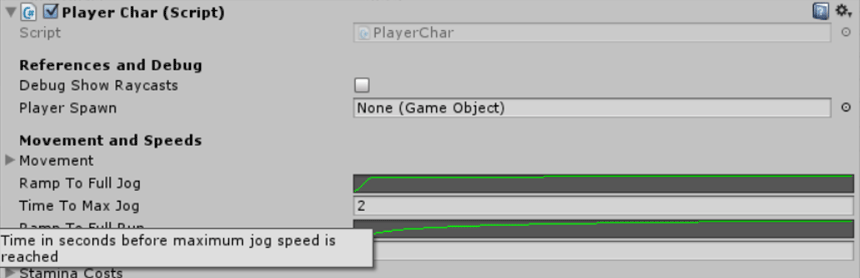
Header: This will create a bolded heading in the inspector. Useful for giving some visual separation and organizing your fields.
Tooltip: Instead of leaving a typical comment above or next to the fields in a class, why not use a Tooltip instead? It serves as a comment in the code and also to anyone who hover’s over the variable in the inspector.
This can make the inspector look something like this:
For more attributes to take a look at, check out this post: A Summary of Unity Attributes
One more attribute of note is the SpaceAttribute, which allows spacing between variables:
[Space(10)] where 10 is the number of pixels.
2. Naming Conventions.. for Strangers
It’s usually a good idea to err on the side of slightly longer variable names, if it makes it more clear and explicit as to what it’s for. When naming a variable I ask myself, will I remember what this does a few months from now? And, could the purpose be misconstrued? If the variable is public and editable in the inspector, then it’s even more important to make sure someone who isn’t the one coding it would know what it does (extra explanation can be added with tooltips as mentioned earlier).
Bad / Mediocre:
- jj
- camP
- beforeSlide
- bRunning
Good / Better:
- justJumped
- cameraPosition
- timeBeforeSlideControlLoss
- isRunning
Another consideration in naming for inspector is how it formats the display of variables. If you prefix your booleans with the letter “b”, as is one common convention, this won’t show up that nicely. In the inspector, variables using camelCase are displayed as capitalized words separated by spaces. So bMyVariable would appear as “B My Variable”. Instead, I typically use names like isRunning or shouldDoThing or showDebug. This is also slightly more clear as to the purpose without additional explanation.
3. Draw Custom Gizmos; Visualize Numbers
Gizmos are the colored visual aids within the scene view that help with debugging. The green box seen around an object with a BoxCollider is a gizmo. Within the OnDrawGizmos or OnDrawGizmosSelected functions, different functions can be used to draw lines, cubes, spheres, rays, icons, etc.
Scripts with some sort of vector positions or limits, that involve the camera frame, or other values dependent on others or related to the visuals, are all good candidates to include some gizmos. Drawing them can save you time when something isn’t working quite right, compared to just printing out individual values or having to compare sets of values.
One of the best usages of gizmos that I have seen lately is in ProCamera2D from the asset store. Their camera script has a whole bunch of custom gizmos that allow you to visualize what the camera and its extensions are doing. This is from the feature that “limits camera distance”:
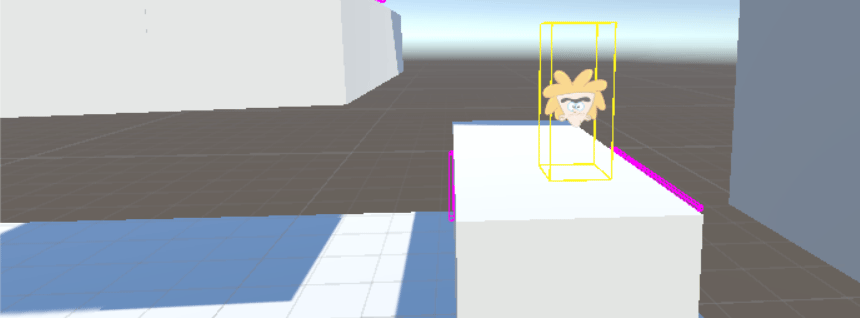
Here’s a simple example from our game that we use for our spawn point script. It draws a yellow box around a custom icon. The box is to show the size of the character when placing the spawn point, since it is just a Transform (position):
4. Better Defaults (Resetting)
Defining a useful Reset() function is something that often gets overlooked, as it’s usually not necessary. Straight from the documentation:
Reset is called when the user hits the Reset button in the Inspector’s context menu or when adding the component the first time. This function is only called in editor mode. Reset is most commonly used to give good default values in the inspector.
The example on the docs page has Reset using Find in the scene, to assign a GameObject to a public variable, if none is set. So, this is good for assigning default values that are a little more complex than just a constant number, such as references to components or GameObjects. Or variables whose values you want to be different than what is defined in the class.
Even though Reset is commonly for use in the Editor, you can also manually call the Reset() function during gameplay to access your customized resetting code.
Here’s a super simple example from part of our BreakableJoint class. To give a little background, this class implements our IDamageable interface, so that it can take “damage”. After a certain amount is received, the Joint will be removed, so the attached object will fall. Here, this shows how it could be used to set private variables when you’re using both a current value and a starting value (health).
5. Classes, Structs, Number Ranges, etc.
Specifying another class as serializable and then declaring a public variable of that type will make it appear with an expand/collapse arrow in the editor. Which is great for grouping very similar variables together, and reusing a type in different classes.
If your float or integer will always be between two values, use the Range attribute. This creates a draggable slider in editor. Not only does this keep the value between values that you want in code, it gives a clue to the person making modifications in the inspector as to what the general range is. Otherwise, they may have questions like: Is this value between 1 and 10? Or 1 and 1000? Can it be negative?

Another noteworthy attribute is MultilineAttribute, which causes the variable to use a multiline textbox for editing:
[Multiline(4)] where 4 is the number of lines. Default is 3.
6. Requiring and Decoupling
If your component needs references to other components to operate without errors, it’s a good idea to use the [RequireComponent] attribute. When you first add a script to a Game Object, this will automatically add the required components if they aren’t already attached. So if your AwesomePlayer class requires a Rigidbody, a Rigidbody component will automatically be added when you add your AwesomePlayer component script.
In general it’s good to check if references are not equal to null before using them in code. During Awake or Start, consider using a Debug.Log or Debug.LogWarning to let the person testing know that something expected is missing. Especially if you’re using Find or GetComponent to find and store those references.
A Note on Decoupling:
Overall game architecture is a matter of opinion, debate, and style. As Unity itself uses a component architecture, and games have so many interconnected systems that need to know about each other, generally it’s considered good practice to try and keep your components very decoupled/self-contained. The more that a script does not require or access others, the more likely that designers will be able to play around with it and use it on other objects. A great component needs only concern itself with itself.
Using an events-based approach can help with this. For example, a handful of separate scripts may subscribe to a PlayerSpawned or PlayerDied event, and do something that the others do not need to know about—changing UI elements, resetting values, playing sound effects, setting a position, a ragdoll activation, etc.
7. Advanced: Custom Inspector Programming
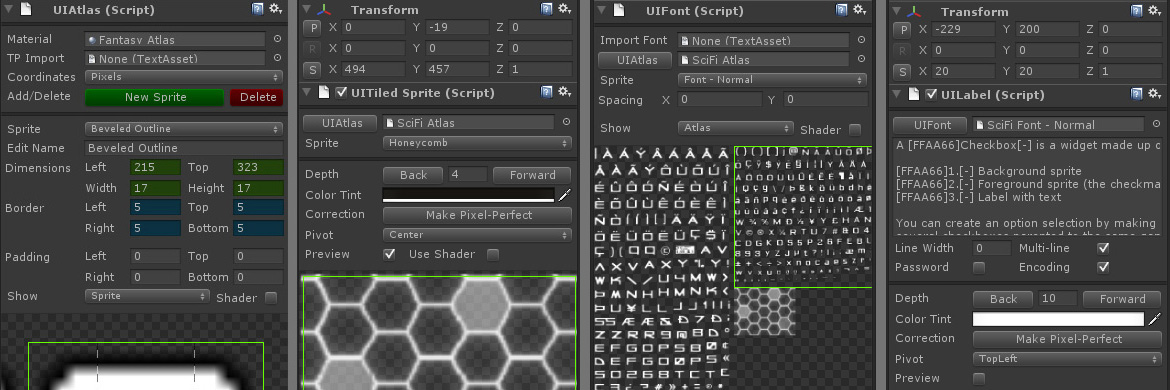
Example of custom inspectors in NGUI
Unity allows you to take custom programming of the inspector to another level. You can draw your own areas in the UI, handle values in a different way, draw to the preview window, or even display a separate window. I won’t get into this in depth here, as it can get quite complex. Here are some more resources and examples to get you started:
- Official Unity Video Tutorials: Extending the Unity Editor
- Creating a Custom Inspector
Shows how to display a custom property that is calculating a character’s level based on their experience (+a label). As you change experience, the level’s value will update in the inspector. - Adding Buttons to a Custom Inspector
Goes over creating a “Build Object” button that when clicked, will instantiate at object in the scene at your specified spawn point. Or run any custom function that you need. - The DrawDefaultInspector Function
Make sure existing inspector fields are displayed in addition to your custom inspector, by calling DrawDefaultInspector() in OnInspectorGUI() - Unity Editor Extensions – Menu Items
How you can add your own scripts to the top-level toolbar in the Unity editor.
- Creating a Custom Inspector
- Manual: Extending the Editor – Editor Windows
There are 3 pages in the manual about creating custom windows, property drawers (customize the look of controls), and custom editors. - How to Add Your Own Tools to Unity’s Editor
Creating an editor window, and a color picker whose selection is used to draw a grid. Adding the ability to create and delete objects, snapped to this grid, and undo those actions. - Spruce Up Your Custom Unity Inspectors with a Preview Area
You know that area in the inspector that lets you hit play and preview an animation? Well, you can draw your own things there by overriding HasPreviewGUI. In this tutorial, the author shows how to draw a custom mesh there (code provided).
Thoughts?
Have you seen any examples of what not to do? Perhaps the work of another programmer that had you scratching your head? Or, any other suggestions based on the experience with your team?
Getting the Angle of Sloped Ground Beneath a Player in Unity

Nice guide! thank you!